Novel AI is a text-generation platform that allows users to write, expand, or structure creative content with the assistance of an AI model. While the interface looks straightforward at first, the system relies heavily on specific tools, such as Memory, Author’s Note, Presets, and the Lorebook, to maintain consistency and produce controlled output.
For users who are opening the platform for the first time, the number of panels, settings, and options can feel overwhelming because Novel AI does not provide guided onboarding inside the editor.
This guide presents a complete, clear, and structured walkthrough of how to use Novel AI from account creation to exporting your fully generated text. Every step is explained in plain language, with enough detail to help new users understand why each component exists and how it affects the writing process.
The goal is simple:
To help you operate Novel AI smoothly, avoid common mistakes, and work efficiently without relying on external tutorials or trial-and-error.
Account Creation and Initial Platform Access
Step 1 — Visit Novel AI
- Go to https://Novel AI.net.
- You’ll see “Log In” or “Sign Up.”
Step 2 — Create Your Account
- Enter your email and password.
- Verify your email if prompted.
Step 3 — Select a Subscription Plan
Choose from:
- Tablet
- Scroll
- Opus
Plans determine context size, available features, and monthly limits.
Step 4 — Access the Dashboard
The dashboard displays:
- New Story option
- Your saved stories
- Image generator (if available)
- Settings
- Subscription management
Understanding the Editor Layout
Novel AI’s editor has several important components. Learning them first prevents confusion later.
Central Writing Pane
Main workspace for typing and AI-generated text.
Right Sidebar — contains all functional tools:
- Presets
- Memory
- Author’s Note
- Lorebook
- Generation parameters
- Story settings
Bottom Control Bar
Contains:
- Generate
- Retry
- Regenerate
- Undo
- Stop generation
- Output length
Top Navigation
Allows:
- renaming the story
- accessing chapters
- exporting
- returning to dashboard
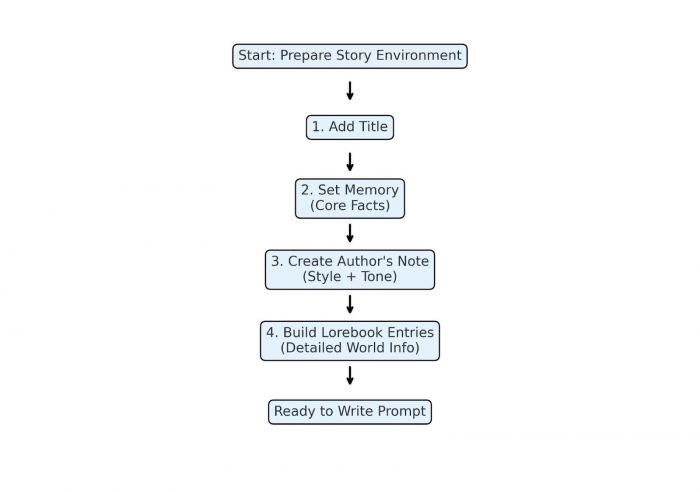
Preparing the Story Environment
Novel AI works best when the environment is set before generation.
Add a Title
Rename “New Story” to something descriptive for the organization.
Set Up Memory
Memory stores the essential, unchanging information of your story.
What to include:
- character names
- character traits
- stable relationships
- settings
- rules of the world
- timeline basics
Example Memory Block:
Aiden – introverted mechanic, dry humor.
Mara – bold, loyal, impatient.
Setting: Neon-lit city of Velar.
Rule: AI modifications are illegal.
Keep it concise.
Novel AI reads Memory on every generation.
Create an Author’s Note
Controls tone and behavior of writing.
Example:
Tone: grounded, realistic, slow pacing, minimal melodrama.
Use one or two sentences maximum.
Build Lorebook Entries
The Lorebook stores detailed information activated by keywords.
Each entry contains:
- Title
- Keywords
- Description
Best for:
- world history
- organizations
- factions
- character backgrounds
- magic/technology rules
- geographic locations
Do not overload it unnecessarily.
Choosing and Understanding Presets
Step 1 — Open the Preset Tab
Found in the right sidebar.
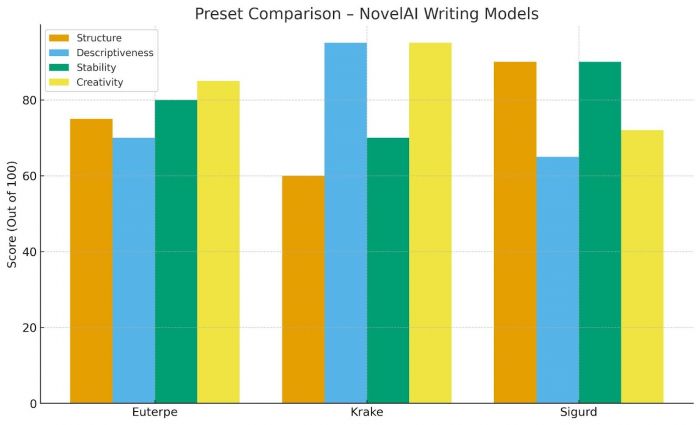
Step 2 — Select a Preset
Presets influence writing style:
Euterpe — balanced
Krake — expressive
Sigurd — structured
Step 3 — Adjust Settings (Optional)
Advanced settings include:
- temperature
- top-k
- top-p
- repetition penalty
- output length
- stop sequences
- padding length
If unsure, keep defaults.
Writing Your Initial Input
Novel AI depends heavily on your first prompt.
Step 1 — Write a Starting Paragraph
Novel AI performs better with:
- scene description
- character action
- dialogue starter
- emotional moment
- location setup
Avoid single-line prompts like “Write a story.”
Step 2 — Place Cursor at End
Location of the cursor determines where AI continues.
Generating Content
Step 1 — Click Generate
AI begins writing below your last line.
Step 2 — Review Output
Check:
- continuity
- tone
- logical sequence
- adherence to Memory and Lorebook
Step 3 — Use Correction Tools if Needed
- Retry: rewrites the last output
- Regenerate: new output attempt
- Undo: deletes last generation
- Edit: manual corrections
- Continue: extends text without new prompt
Alternate between manual writing and AI writing for best structural control.
Using the Editor Tools Correctly
Undo
Removes recent AI text only.
Retry
Generates a new variation based on the same prompt area.
Regenerate
Creates a completely different continuation.
Edit Mode
Allows rewriting, merging, or removing text manually.
Continue
Generates text without additional input; may reduce coherence if overused.
Maintaining Continuity in Long Stories
Step 1 — Update Memory Frequently
Whenever character details change.
Step 2 — Expand Lorebook When Necessary
Add important locations, items, rules, etc.
Step 3 — Adjust Author’s Note When Tone Changes
Ensures consistent narration.
Step 4 — Split Large Stories into Chapters
Keeps context window manageable.
Step 5 — Watch for Drift
If continuity breaks:
- adjust memory
- rewrite inconsistent part
- regenerate forward text
Saving, Organizing, and Exporting
Auto-Save
All text saves as you type.
Manual Save (Optional)
Click save icon.
Organize Stories
Dashboard allows renaming, duplicating, deleting, and archiving.
Export Options
Export in:
- TXT
- HTML
- Backup JSON
- Story package
Move exported content to external editors if needed.
Optional: Using Image Generation
Available only on certain plans.
Step 1 — Open Image Panel
From the dashboard.
Step 2 — Enter Prompt
Describe character or scene.
Step 3 — Adjust Settings
Resolution and stylistic controls vary.
Step 4 — Generate
Images save automatically.
Conclusion
Novel AI includes multiple components that work together to produce text. For new users, the interface can feel complex because many of its most important tools, such as Memory, Presets, and the Lorebook, are located in side panels rather than the main workspace.
This guide centralizes every essential step so that beginners can navigate the platform without confusion, create organized stories, maintain continuity, and manage long-form writing effectively.
By following the steps in sequence, users can set up a controlled environment, provide clear initial input, and manage the AI’s output using the available tools. While the learning curve may be higher than simpler writing platforms, understanding each component up front ensures a more stable and predictable writing experience.
Post Comment
Be the first to post comment!